Toshiba T1900/T1910/T1910CS Repair
Just wanted to document this, and I know my details are a bit vauge but when I start a project I always google for other people's stories so wanted to type this one out a bit.
I have a pile of Toshiba T19xx laptops from the early 90s, most of them you try to power them up and they run for 1 second then turn back off again. I did some google-fu and on some old newsgroups I discovered this failure was fairly common and was due to a single capacitor in the power supply. Not having much to lose I decided to open one up on live stream the other day and give it a crack.
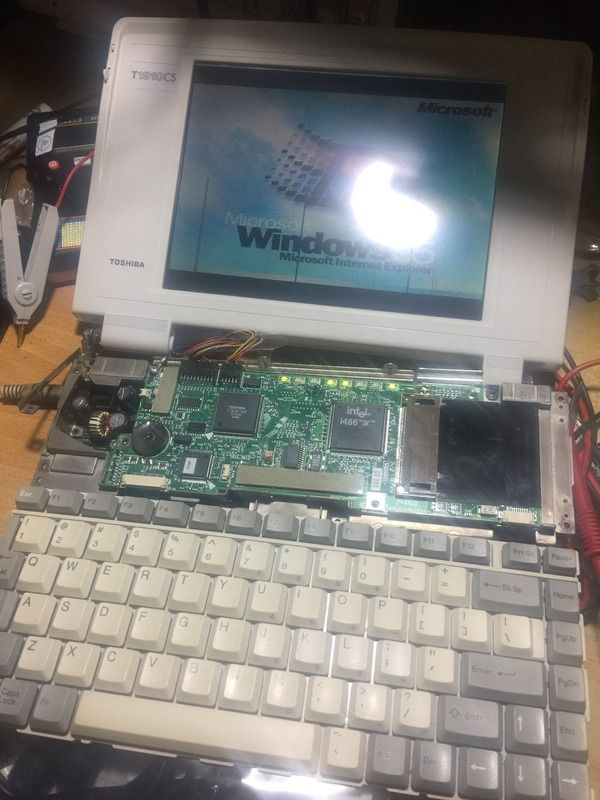
Sure enough I found a 6.3V 1000uF capacitor with an ESR of 69 ohms! (It should be around 0.05). Replacing this single component, the machine fired to life and booted Windows 95:

Unfortunately I didn't grab great pictures. But for anyone else jumping in - it's not the big 2200uF cap, it's the smaller 1000uF cap that was at fault (both are brown, and the other larger cap + smaller blue caps all showed an ESR lower than my china replacements). I used a 10V 1000uF cap as a replacement - tested at 920uF and 0.1 ohms ESR.
The power supply is at the rear bottom of the machine, so you need to completely dismantle the entire laptop to get to it.
To remove the top cover you need to remove 4 screws at the back, and one screw just above the keyboard (under a little cover), then you start prying the clips from in front of the keyboard and work backwards. Being aged, the plastic is quite brittle, so a lot of care needs to be taken - especially the pieces on the left and right of the keyboard. Once you're in, dismantling becomes self-explanitory. The top motherboard with 486 CPU just lifts off with some gentle encouragement, then you can get to the power supply.
The cap looked fine visually, but I really have to recommend the MESR-100 ESR meter, it really did work and identified the bad part straight away in-circuit.
Unfortunately, I didn't know the screen was damaged until after I'd done the repair! But that's ok, I have a lot more to get through.
Another thing is the RTC battery is rechargable, and only advertised to keep the settings for 1 month - so if you get one with a CMOS error, try leaving it plugged in for 24-48 hours.
I also discovered my suspend battery (a 1.2V AA NiMH) was able to recharge fairly well. The main battery pack can have it's internals replaced - I haven't ordered it yet, but I found a pre-soldered set of battery modules that looks like an exact replacement for the inside of the Toshiba battery on ali-express.
I have a pile of Toshiba T19xx laptops from the early 90s, most of them you try to power them up and they run for 1 second then turn back off again. I did some google-fu and on some old newsgroups I discovered this failure was fairly common and was due to a single capacitor in the power supply. Not having much to lose I decided to open one up on live stream the other day and give it a crack.
Sure enough I found a 6.3V 1000uF capacitor with an ESR of 69 ohms! (It should be around 0.05). Replacing this single component, the machine fired to life and booted Windows 95:

Unfortunately I didn't grab great pictures. But for anyone else jumping in - it's not the big 2200uF cap, it's the smaller 1000uF cap that was at fault (both are brown, and the other larger cap + smaller blue caps all showed an ESR lower than my china replacements). I used a 10V 1000uF cap as a replacement - tested at 920uF and 0.1 ohms ESR.
The power supply is at the rear bottom of the machine, so you need to completely dismantle the entire laptop to get to it.
To remove the top cover you need to remove 4 screws at the back, and one screw just above the keyboard (under a little cover), then you start prying the clips from in front of the keyboard and work backwards. Being aged, the plastic is quite brittle, so a lot of care needs to be taken - especially the pieces on the left and right of the keyboard. Once you're in, dismantling becomes self-explanitory. The top motherboard with 486 CPU just lifts off with some gentle encouragement, then you can get to the power supply.
The cap looked fine visually, but I really have to recommend the MESR-100 ESR meter, it really did work and identified the bad part straight away in-circuit.
Unfortunately, I didn't know the screen was damaged until after I'd done the repair! But that's ok, I have a lot more to get through.
Another thing is the RTC battery is rechargable, and only advertised to keep the settings for 1 month - so if you get one with a CMOS error, try leaving it plugged in for 24-48 hours.
I also discovered my suspend battery (a 1.2V AA NiMH) was able to recharge fairly well. The main battery pack can have it's internals replaced - I haven't ordered it yet, but I found a pre-soldered set of battery modules that looks like an exact replacement for the inside of the Toshiba battery on ali-express.