Restoring and Repairing two Apple II Clones
This is the next chapter in the Apple haul I took delivery of a month or so ago. Most of the computers in the stash were Apple IIs. Of these one was an Apple IIGS (reported on previously), one was an Apple IIe platinum, one was a genuine Apple ][+, and four were Apple ][+ clones.
This blog report is on these four clones.
 Figure
1. A stack of dirty RX-8800s
Figure
1. A stack of dirty RX-8800s
The units consisted of one Redstone computer and three oddballs known as Rx-8800s. The Redstone had the classic Apple ][+ shape. The RX-8800s on the other hand, didn't look like Apples at all. They looked as if they would be more at home in an engineering lab. A kind of retro-HP/Scientific instruments appearance. There was little to be found by googling for information on these micros. I'm assuming they were from Asian company (as is the Redstone).
Like all micros in the haul, they were much abused and neglected. All had been used as mice nests. One RX-8800 had it's top missing and power supply gone.
The first job was to disassemble all units and brush off the mouse droppings and spider webs. Before going any further though, I thought I'd check to see if if any of the power supplies and boards actually worked. They all looked like they might blow up in spectacular fashion once the juice was flowing. Using my Apple IIe monitor (which I knew was good) I plugged them in, stood well back and turned them on!
Amazingly two of the power supplies actually worked (including one whose case was as rusty as!)!! The remaining one made a ticking sound and the voltages were way off. I decided not to try to salvage this one. None of the four boards worked though. Absolutely nothing showed on the screen with any of them. No surprises there!
Anyway, I had two good power supplies. Also an inspection of all four boards showed two of the boards had static components missing (a transistor and capacitor respectively). So, two good power supplies and two good boards. And four sets of ICs. Enough to restore two of the units with plenty of chips to spare it would seem.
Having decided what bits and pieces I was going to use, the next task was to give everything a real good clean. I removed the chips from all the boards, cleaning each of the the pins with a little sandpaper to get rid of any oxidation. Many were so corroded the pins simply fell off!
Then the circuit boards, the cases and one of the keyboards all went in the dishwasher.

Figure 2. RX-8800 bits and pieces after a wash
After a good soak using a tiny bit of detergent rather than dishwashing powder, the components spent some minutes in a fan-assisted oven (40 degC) to drive out any remaining moisture. I only put one of the keyboards in the dishwasher, as I had a sneaking suspicion the process would wreck it. I had spares just in case.
Some folks felt you could also dishwash the power supplies too. Sorry, I wasn't that bold! (-:
I elected to set the dishwasher to super-heavy duty cycle to reflect the state the computers were in. That may have been a miscalculation as one of the RX-8800 tops came out looking like this (see Fig 3).

Figure 3. A somewhat warped top of an RX-8800
The motherboards were then given a good spray of contact cleaner. All units were now bright and sparkling.
After re-populating the boards using the ICs in the best visual condition, it was time to figure out which chips were faulty and which weren't. Hmm..not an easy job. Without a working unit, there was no way to know if a substituted chip was faulty or good. There was a good chance that several chips one each machine were not working, so a bad chip replacement might go un-noticed.
I decided to concentrate on one machine at the time. First i measured the voltages on the board to check the PSU was working properly under load. These where fine. Then I measured the voltages on the CPU to determine in a RESET was happening. It didn't seem to be, but then I remembered that with some keyboards, CNTRL/RESET rather than just RESET is necessary. Indeed, doing this showed a drop to 0v. So a RESET was taking place.
Hmm...looking at the pins on the CPU while measuring the voltage I noticed many were very rusty and corroded. On a hunch I swapped the CPU for a less-corroded one. This time, switching on produced a (feeble) beep and the picture below....

Figure 4. Progress! The first sign of awakening
Progress! I was getting video. Occasionally I'd even see characters on the screen. I figured this was likely now to be a RAM problem. Which RAM chips were faulty though? There are 24 of them!
Then I remembered that I had 2 language cards that came with the machines. These had 9 and 8 DRAM chips respectively and because they were sitting vertical in the cases, had escaped being drenched in mouse pee. Hmm..maybe I could used the RAM from these. I found the cards and extracted their RAM (see pic).

Figure 5. A Language Card de-RAMmed
I then replaced the RAM in the Apple II clone with this RAM, making sure I used the same type of 4416 for each of the three banks, just to give myself the best chance. For the final bank, I selected the cleanest chips I could find from the ones I had been using. I flipped the switch and I saw this...

Figure 6. It's Alive!!
At last!! It works! Note the message. "READY GO" rather than APPLE ][+ (lol). Well, I guess it is a clone after all.
So now I had one good board. I put it to good use testing the RAM I had been using in the other clone and the Europlus prior to the chip transfusion from the language cards. Two of the clone RAM chips and 4 of the Euorplus RAM chips were faulty . Certainly worth finding that out!
I now seemed to have two working units. Would they work with disk drives though?
I cleaned up and attached two disk drives from the haul, to see what would happened. Flicking the switch saw a red light flash and a motor whir... Both drives worked, and loaded DOS 3.3 without a problem. Yes!!
I grabbed some on my existing Apple IIe disks to see if my copy of Apple Panic would load. On the first clone it looked like this...
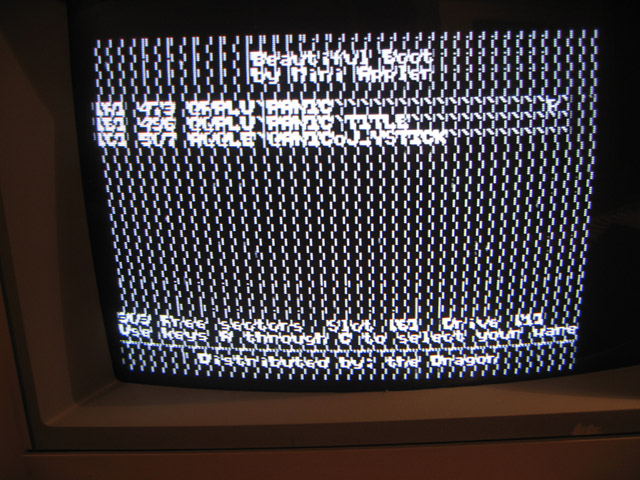
Figure 7. Don't Panic but your screen is a mess!
Arrg!! The zigzag screen appeared only in graphics mode. In text mode the display was fine.
On the second clone, where all the RAM had been tested, it looked like this...

Figure 8. Apple Panic as it should be (minus the colour)
Now that's more like it!
Some more testing and it was found that the "snowy" hi-res picture was caused by a faulty RAM chip servicing the memory location of one of the graphic pages. Just goes to show that just because a machine boots, that doesn't mean all RAM is ok.
Neither machines seems to show colour but maybe it's the software I'm trying to run or the Apple IIe monitor I'm using? Hard to believe BOTH machines would be faulty in this area.
So, here they both are. I wish I'd taken a before-and-after picture. You wouldn't believe how disgusting they looked when I first started working on them! Figures 9 and 10 shows the Redstone Clone....
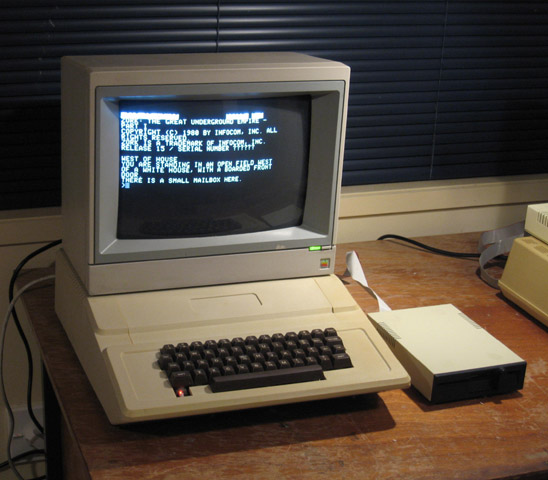
Figure 9. Redstone Apple ][+ clone (has lost its badge)
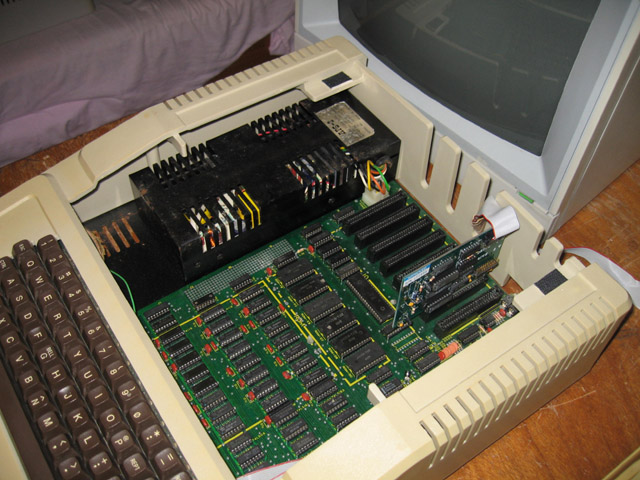
Figure 10. The clean and tidy circuit board inside the Redstone
Figure 11 is the RX-8800. This one is a good candidate for the peroxide treatment, but I can imagine it would have made a nice machine in its day with its numeric keypad and all.
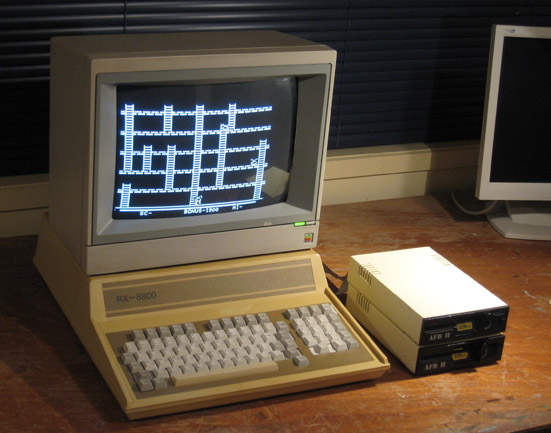
Figure 11. A working RX-8800
So fixed, right?
No, wrong. I decided to boot DOS 3.3 and run a few diagnostic tests. As soon as I started to type something, I got a string of letters all the same. Uh oh...
 Fig
12. Keyboard problem on the RX-8800.
Fig
12. Keyboard problem on the RX-8800.
What is wrong? I figured it could be
- 1. The keyboard (it had been through the wash after all)
- 2. The cable connecting the keyboard
- 3. One of the three ICs in the computer controlling the keyboard.
Luckily, I could substitute all three!
The last of these three tasks revealed the problem. A faulty IC within the computer itself. This was replaced with a spare and the machine was fully working.
So NOW at last I had two working disk-based versions of Apple ][+ clones. Still no colour, but I suspect this is more incompatibility with the screen than problems with the two computers. When I clean up the clone screens themselves, I can look at this issue.
Messing with these clones has taken some time. Two weeks in fact of evenings and weekend. However, I learnt a lot and there is nothing quite as satisfying as seeing these venerable machines gradually take life. My thanks to all those who helped on the Vintage Computer Forums.
Next task? See how many of their monitors can be resurrected as well.
Tez
19th September, 2008
[Edit: 4th April, 2009. The RX8800 has now been de-yellowed]
| Tweet |