Your Dishwasher. An Indispensable Tool for Fixing a Mac Classic II??
With two Mac Classic IIs in the stable already you would think I would have enough of these models. However, when a friend donated a further unwanted and unloved unit this weekend I just had to take it. I love the iconic appearance of the Baby Macs and besides, it would make a useful parts machine. That is...except......well, I just HATE the thought of having a non-working computer in the house.
I felt I needed to take a look at it anyway. (-:
Symptoms
This computer was clinically dead. Booting up revealed black and white vertical stripes, similar to this image (photo 1) I found on the web in a forum discussing this very problem (I forgot to take my own photos of the symptom). There was no "bong" or other sign of life. Boot-up was stalled early in the process.
 Photo
1. Screen symptoms (Not my machine but the symptoms are the same)
Photo
1. Screen symptoms (Not my machine but the symptoms are the same)
Research
Like all repairs, the first step was to do some research. Googling (and Yahooing) found quite a bit of information on fixing vintage Macs, including this useful document . Some documents and postings suggested the symptom opposite might be caused by ROM ICs that may need re-seating or dead batteries. Most though pointed the finger at leaky capacitors. Capacitor fluid is semi-conductive and if residue leaks onto the board, electricity can flow between components it shouldn't be flowing between.
Until this project, I'd always regarded leaky capacitors as being obvious. You know, oily black gunk over the circuit board, corroding away traces and the like. However, on researching the issue it would appear this impression was incorrect. Capacitors can be subtle. Leakage may be discreet and not all that easy to see.
There was one thing all the literature and discussions did agree on. Leaky capacitors were "a known issue" in Baby Macs especially the "Classic" models!
Inspection
I cracked open the case and removed the logic board at the bottom in order to check out the capacitors. I was struck immediately by how different this model is to the SE (a model I'd recently been working on), even though externally they look similar.
The logic board was small (much smaller than the SE), compact, and easy to remove. The first thing I did was to reseat the socketed ICs. No change. I removed the board again, held it under a strong light, donned my magnifying helmet and looked carefully at the capacitors.
Hmm...nothing obvious...
...or was there?
I didn't see any black discolouration, but I did notice something suspicious. Clear, "oily" areas around a number of the capacitors. They weren't that obvious. There was no staining at all. The only reason they stood out was because dust had adhered to them, making these "puddles" on the circuit board duller in appearance . You can see them as the whiter areas in the photo below.
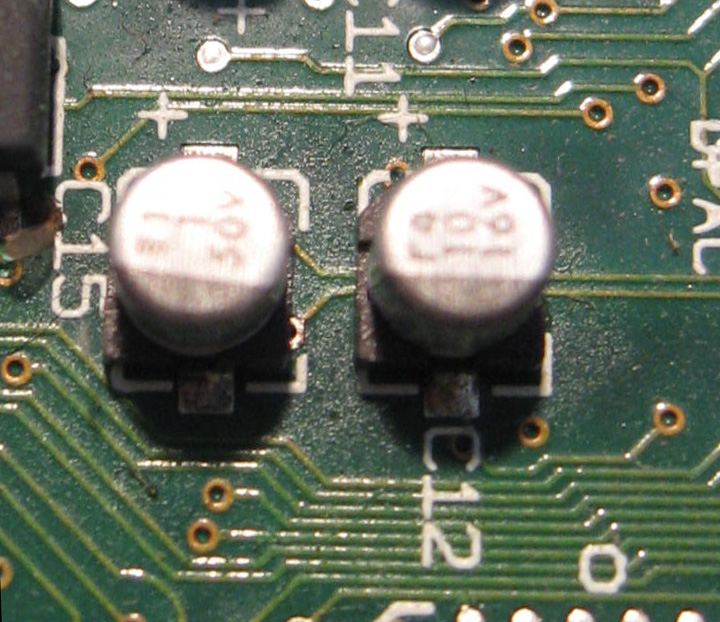
Photo 2. Oily regions below some of the capacitors
This was the smoking gun I was looking for (or I should say smoking guns as there was a number of them)! These capacitors seemed to have leaked during their long period of inactivity.
Repair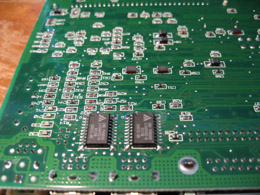
I wasn't 100% sure leaky capacitors were the problem, but they were top of the list. But...how does one repair this kind of thing? The capacitors were small surface-mounted units, rather than through the circuit board ones as older capacitors would have been.
Furthermore, the other side was packed with surface-mount components soldered by robots and unsuitable for unsoldering by man (photo 3).
What's more again, about 1/2 the capacitors on the board had indulged in this "boardwetting"!
Photo 3. Underside of logic board showing surface-mount components
A radical treatment?
One of the forums I read suggested simply putting the logic board in the dishwasher! A warm prolonged shower should wash the residue away, and the board may well return to its normal self, at least for a good while.
Had I been a novice this advice would have shocked me. Water and electronics...it just didn't seem right! However, I've had a number of circuit boards through dishwashers for past repairs and it seems to do no harm.
Worth a go then. I removed the ROMS and the RAM and stacked the planar as I would a plate in the dishwasher. The board looked lonely in there all alone (photo 4) but I wasn't going to wash it with the breakfast dishes. Wet doughy gunk in the external floppy drive port from cereal and bread residue would not exactly be Mac friendly!
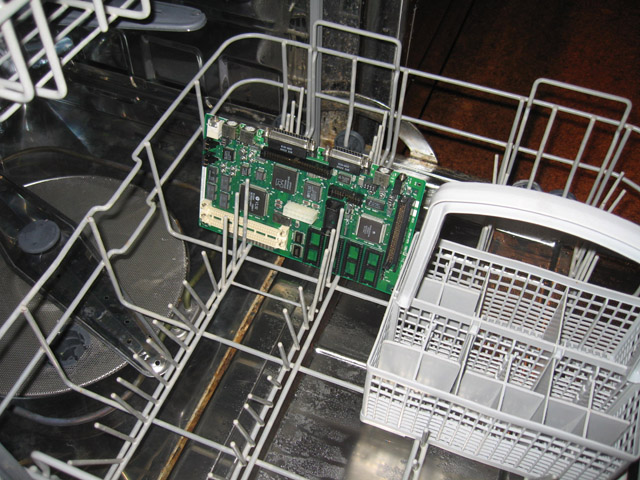
Photo 4. Mac Classic II logic board in the dishwasher
I used a small amount of detergent rather than dishwashing powder and set the cycle to FAST/WARM. After washing I then dried the board in a fan-assisted oven at about 40 deg C for about 30 minutes until COMPLETELY DRY.
Inspection
I donned the magnifying helmet again for a good close look. All the residue appeared to have gone! That was a good sign. But would it fix the problem?
Result
I reinserted the logic board and reconnected everything up. Added a keyboard and a mouse and flicked the switch! "Bong'"...SCISI drives whirred and chattered....a white screen appeared....with a smiley Mac face!
FIXED!!!
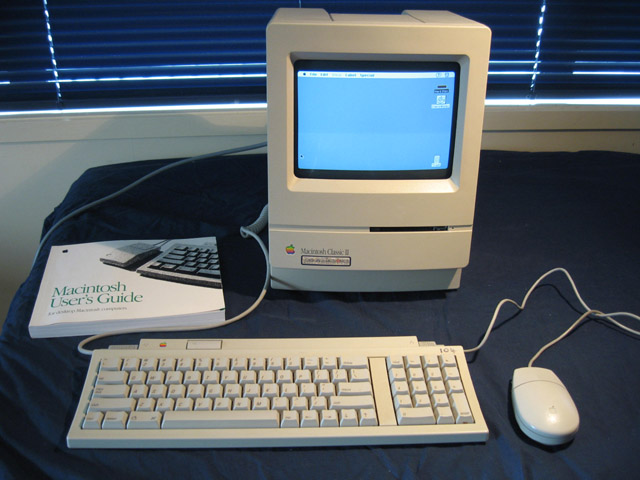
Photo 5. A happy, working Mac Classic II (now one of three!)
Reflections
This was a relatively easy fix, but as with all my projects, I learnt something. I'd always assumed when capacitors leaked, they REALLY leaked. A little like a battery. I thought the leakage would be so obvious there was no missing it. I know now this is not always the case. The residue can be clear, transparent and hard to see. Next time I'm inspecting capacitors for leakage, I'll be sure to look for something a lot more subtle.
Ideally, this Classic II should have all its leaking capacitors replaced. However there are a number of them and it would be difficult and time-consuming to do. Also, I do have another two working Classic IIs. From my reading it seems machines can live with leaky capacitors, just as they can with some non-essential blown ones. Most of the time, the leakage is slow and although they WILL cause problems again eventually, it could be years away. When that time comes, maybe another cycle in the dishwasher will see them right for a similar period?
That said, further discussion with others say it would be safer to try a board cleaning solvent first. (-:
Tez
Original posted 13th April, 2009. Amended 8th January, 2012
Disclaimer: I processed the logic board this way as a last resort. The unit wasn't valuable and I had two others. Although some people swear by this technique others say there are dangers in using it. Try it entirely at your own risk.
Update: Since writing this article I've cleaned up the capacitor electrolyte from two other Classic II boards.