More Vintage Forensics: Re-repairing an Apple II+ Clone
 Photo
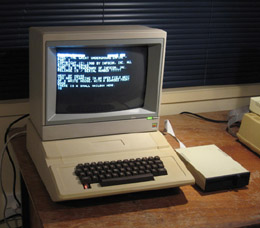
1. A Redstone Apple II+ clone
Photo
1. A Redstone Apple II+ clone
My repairs on machines in the Apple haul left me feeling very pleased with myself. I had resurrected four, and had a sackload of parts to boot.
It doesn't pay to feel too smug though. Old machines with a history of abuse and neglect can still have issues lurking even when you think you've found them all.
So it proved with my Redstone Apple II+ clone.
This is a machine I was using as my "working Apple II+", the real Apple II+ being too precious to play around with, and the other clone decked out as a CP/M machine. Imagine my dismay when it started to exhibit the problem described below...
The symptoms
The machine started off fine from cold. Then after about 15 seconds it would simply lock up. Switching the machine off and on again always resulted in a hung machine with white screen with a diffuse pattern. Hence the computer only worked for a few seconds at the beginning of a session.
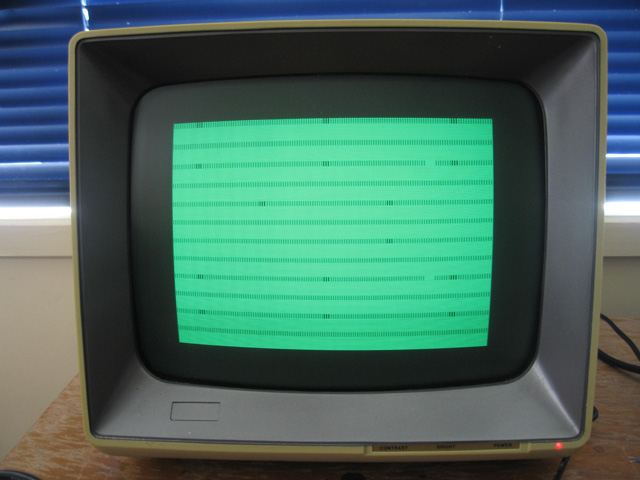
Photo 2. Screen symptom
Initial tests
My first thoughts were that an IC had gone bad. One thing good about having equivalent machines means you can swap ICs with known good ones and see if that fixes it. I proceeded to do just that. However, after swapping out ALL the ICs and still having the problem, I decided I had to look elsewhere. Power supply maybe? The voltages looked ok, but I tried a known-good power supply from another unit. Same result. bugger!
Damaged socket or track maybe? Putting on my magnifying helmet I scoured the sockets and board for problems. No damaged tracks in evidence. I re-soldered one or two dodgy looking solder joints but this made no difference.
The problem was obviously heat-related and something on the motherboard. I suspected a damaged socket or perhaps a static component. Finding the problem wasn't going to be an easy job. I shelved it for a while until I could gather more skills and resources.
A serious diagnostic effort
After I had success with repairing a couple of disk drives with a loaned oscilloscope, I pulled out the computer again.
This time it wasn't going to be some half-baked try-it-and-see approach. I'd gained enough knowledge now to start from first principles. The resources I armed myself with were...
- Jim Sater's book "Understanding the Apple II" (I'm amazed to find I can actually understand most of it now!)
- The Apple II Reference Manual
- The oscilloscope mentioned above (kindly loaned by Philip Avery)
- A multimeter
- Another Apple II + clone for comparison purposes
Isolating the problem
 Figure
1. 6502 CPU Schematic
Figure
1. 6502 CPU Schematic
The old hands on the Vintage Computer Forum suggest starting with the CPU and working backwards for problems like this, and that is what I did. The first job then was to test all the pins with the scope and see if they showed what the Jim Salter's book says they should show.
Nothing looked abnormal as far as I could see until I got to pin 40, the RESET pin. This was low.
Low?
Hmm... According to the book, it should only go low to initiate a Reset. It shouldn't STAY low. If it does, the CPU won't operate...which is exactly what appeared to be happening!
I checked my other machine while it was switched on. Its RESET pin was high. A low RESET pin on the CPU would certainly explain the symptom I'm getting. I had verified the CPU was ok with the chip swap so what was dragging it low?
Time to check the circuit diagram in the Apple II reference manual. This showed the RESET pin is connected to three things. The group of expansion card slots, the keyboard, and a timing IC which initiates a RESET on power up. The latter two can be seen hanging off the RESET line at the bottom of Figure 1.
Nothing was in the slots, so there was unlikely to be a problem there. I removed the keyboard and checked the keyboard socket. Pin 3.. the RESET pin was low. This was expected as I had traced the signal back from the CPU to there. However, it should only have been low if the reset key was being pressed. As there was no keyboard plugged in something else was forcing it low?
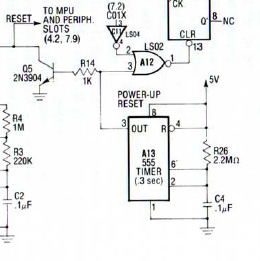 Figure
2. Power up generator
Figure
2. Power up generator
Suspicion fell on the only other subcircuit which could affect the RESET line, the Power-up generator. This is a 555 timer IC which sends a pulse to the CPU, forcing the RESET line low and initiating the start-up sequence. It should only have voltage at start up, yet pin 3 on this IC was showing about 4v all the time. This did not seem normal. To verify I checked with my good machine. Pin 3 was showing 0v on that, apart from a pulse (to RESET the machine) at start up.
I felt I was getting close to the fault. I swapped out the IC just for a second check (there was no change), then resoldered the socket legs. Still no change. Hmm, the socket and the IC seem ok, so it must be something else that is going on around the 555 IC.
Pin 2 also showed an unusual reading. At 1v it was very low. On the good machine this was showing 4.2v. A check on the circuit diagram showed only a capacitor between pin 2 and earth. Suspicion immediately fell on this component. Static components don't fail often, but a faulty capacitor is likely to show symptoms as it warms up.
I reconstituted the solder around the capacitor legs, and the associated resistor. No change. Finally I clipped out the capacitor and replaced it with a de-soldered equivalent one from one of my spare junk Apple II+ boards.

Photo 3. The replacement capacitor
Success!
This time the machine booted up to the READY screen even when warm! Readings on pin 3 and 2 of the 555 now matched those of the working machine. The keyboard worked, turning the clone on and off resulted in a normal reboot and the screen stayed perfectly normal. It was FIXED!

Photo 4. Fixed!!
Reflections
I am pleased with this diagnosis and repair. Mostly because I took a systematic approach to it, and solved it through the application of (newly-found) knowledge, rather than a hit and miss approach. In fact, I would never have found the fault if I'd used the latter. I used the oscilloscope for some of the tests but actually in this case the multimeter would have been enough. Even simple diagnostic tools can give you a lot of information.
Admittedly, it helped a lot to have a working machine to compare readings with. It's one thing to figure that a reading seems odd, it's another thing to actually prove it is by checking on a good unit. Maybe I should get two working units for every one of my vintage machines, so I always have a spare for comparison when making repairs. (-:
I've still got a lot to learn in the "art" of vintage electronics but I feel I've come a long way over the last few months (-:
Tez
26th March, 2009