Another Apple 8-bit adventure: Restoring two Apple IIe units (Part 3) - The Apple IIe (standard or non-enhanced)
Introduction
Part two of the Apple IIe restoration project covered restoring an Apple IIe (enhanced). This article describes the resurrection of the second machine, an Apple IIe (standard).
Out of the two IIes picked up in the Wanganui haul, I was more interested in this one. Why? For a couple of reasons:
- Although the motherboard was different, functionally the IIe (enhanced) was similar to the IIe platinum. I already had a IIe platinum (two in fact).
- The Apple IIe (standard) board was in GREAT condition. Once washed it looked shiny and brand-new. There was no sign of the odd rust spot like there was around the back screw holes of the IIe (enhanced). It was museum quality and I like my collection to be museum quality.
If I could get just one display-quality Apple IIe (inside and outside) out of the two I'd picked up, I'd prefer it to be this one.
Symptom
The symptom was clear and unequivocal. The machine was going nowhere at some point in the boot sequence. The screen showed a mixture of squares and lines, indicative of a hang (Figure 1). There was no beep and no friendly Apple II message.
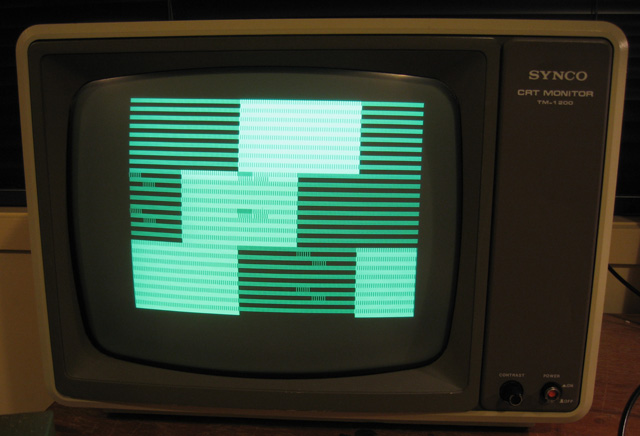
Figure 1. Lines and squares. The broken Apple IIe (standard) symptom
Diagnosis
First I tried reseating all socketed chips. No difference. Ok, time to escalate things to the next level; swapping out all socketed chips. Still no difference. Hmm...
With the easy stuff turning up a blank it was time to get down and dirty. I had no scope but I did have a logic probe. After some confusion because I was reading the ICs upside down (Duh! In the Apple IIes the TOP of the chips point downwards), I managed to ascertain the CLOCK pulse was there and the RESET line was working. The problem seemed to be on the data and address lines. Using the troubleshooting guide in SAMS Computer Facts for the Apple IIe (after ascertaining it was appropriate for this PAL machine) I figured out there were issues on address lines 12 to 15, data lines D2 and D5-D7 and the R/W signal. All were stuck on H (apart from D2 which was stuck on L) when they should have been pulsing.
This was bad news. Trouble on the address and data lines can be hard to track down as they are unidirectional and there are so many ICs involved. Personally, my gut feeling told it was one (or more) of the eight RAM chips even though the old piggyback "good-ram on suspect-ram" technique didn't fix the problem. However, that technique doesn't always work AND it certainly doesn't work if there is more than one RAM chip at fault. Perhaps this was the case?
I did replace the 74LS244 ICs as suggested by the guide. I didn't have any of these chips loose but found an old 8088 board which could donate a few if I could extract them. I could, and did, but socketing and substituting them for those originally in the Apple IIe didn't make a difference.
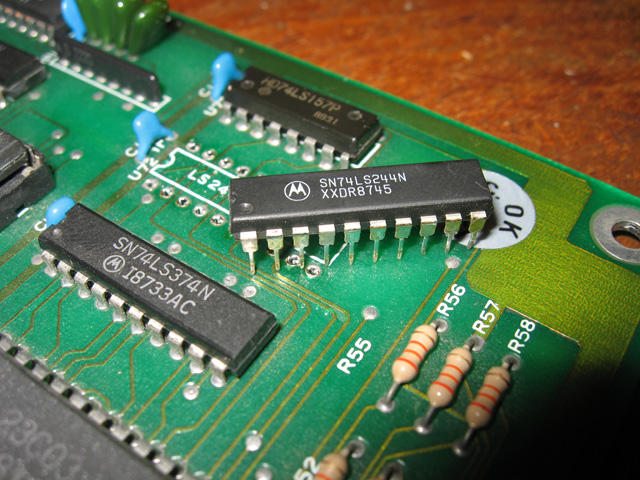
Figure 2. 74LS244 from the donor 8088 board
The fix. Wholesale chip replacement
I considered my options.
- I wanted to keep the Apple IIe (standard) board.
- I wanted a board that I could easily repair in the future if something went wrong.
- Lots of chips were already socketed except for some logic chips and the RAM. Most of these non-socketed chips had address and data lines running through them.
- I had lots of time and the weekend was very wet.
- I didn't have a scope, which was necessary to really pursue this problem.
- I'd become a dab hand at cutting out small chips and soldering a socket in.
- I had lots of spare 64k RAM and logic chips
I decided on the shotgun approach: to simply go through and replace nearly every non-socketed chip with a socket and a replacement IC. I know sockets themselves can cause problems but having all the ICs attached this way would make it easier to fix the board if something went wrong in the future. There was a total of 14 ICs to process. I'm sure at least one of them would be causing the issue however at this stage the main aim of the project became more to socket the board rather than just track down the fault.
Socket the board I duly did, cutting out the old chips and populating the board with a replacements. Usually I tested the machine (and found no change) after each one. The exception was the RAM, which were the last chips to be processed. I socketed the RAM as a bank with the exception of one IC (somehow I'd misplaced one of the eight replacement 4264 chips). When I tested the machine with this one unsocketed RAM chip remaining, I found I could finally get through the boot sequence to the message but the screen froze after that. However the machine now did enough that I could evoke the Apple IIes ROM diagnostic routine (Ctrl-Open Apple-Closed Apple-Reset) which told me that remaining unsocketed RAM chip was indeed faulty. The fact that the machine now booted yet still had a faulty RAM chip told me there was probably more than one IC that was originally at fault.
After a bit of searching I found my missing 4264 (it had got mixed up with my spare logic chips). I replaced the faulty IC with this one in a socket and the board booted up just fine (Figure 3).
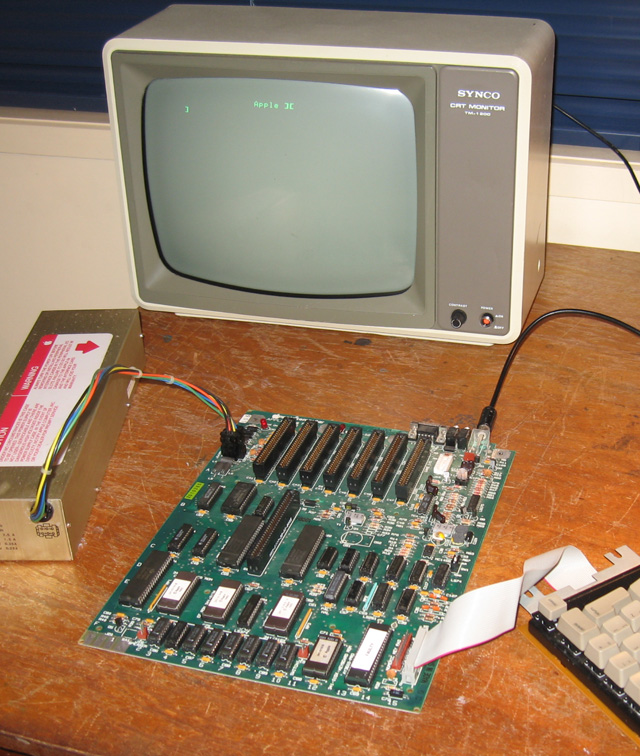
Figure 3. Socketed Apple IIe (standard) board. Now working 100%
Mission accomplished! With the working keyboard encoder re-claimed from the IIe (enhanced) (which had borrowed it) I tested the RAM, ROM and cards with diagnostic software and all passed with flying colours!
Next step
I now had a great looking working Apple IIe (standard) board with almost every IC socketed. The next step was to mix and match my Apple IIe cases, keyboards and motherboards to give me the collection combinations I really wanted...
Tez
4th May, 2011